General
Converter
How to Convert a World
LCE to Java
Java to LCE
LCE to Bedrock
Pruner
How to Convert a Minecraft World from Bedrock to PS3
Play your Bedrock worlds on your PS3 console and relive the classic feel of old-school Minecraft.
There are a couple tricky steps, but if you follow this guide exactly, you'll have no problem.
The Universal Minecraft Tool make it as easy as possible thanks to the exclusive built-in PS3 save resigner.
Table of Contents:
- Step 1: Open the Input Bedrock World
- Step 2: Select PlayStation 3 as the Output Edition
- Step 3: Conversion Options
- Step 4: Convert
- Step 5: Import Metadata from Reference World
- Step 6: Save the PS3 World
- Step 7: Transfer and Play
Step 1: Open the Input Bedrock World
To begin, you'll need to tell to the UMT which world you're trying to convert.
Follow this guide to Open a Bedrock World in the Universal Minecraft Tool
Step 2: Select PlayStation 3 as the Output Edition
Click PlayStation 3 to select it as the target output edition.
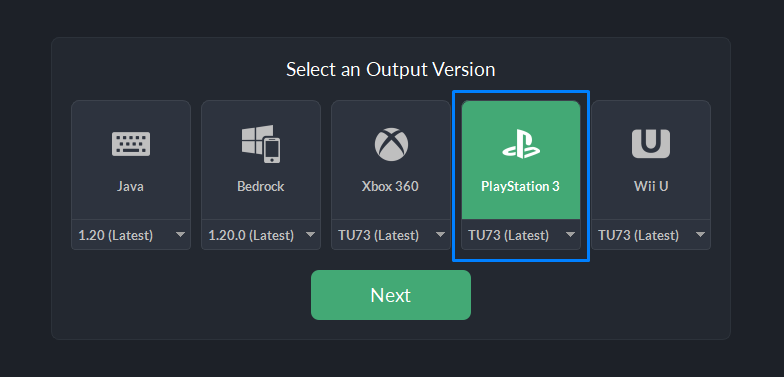
Click Next to continue.
Step 3: Conversion Options
This panel allows you to control certain technical aspects of how the conversion should run. There are several options you absolutely need to pay attention to for Bedrock to PS3 conversion.
Depth Fixer
If your Bedrock world was played on anything on or after the 1.18 Caves and Cliffs update, then you will need to choose what should happen to the blocks that don't fit within the narrower PS3 world height.
Clip+Bedrock: Remove all blocks under Y:0 and add a 1 block layer of bedrock to the bottom of the world. This is common for regular survival worlds.
Clip: Remove all blocks under Y:0. This is just in case you don't want to add a layer of bedrock. For example, a custom map that has void chunks shouldn't have a layer of bedrock after conversion.
Raise: Raise the world up 64 blocks. This is especially useful if your world is a superflat world created on or after 1.18. The bottom of your world will raise from Y:-64 to Y:0 as if it was created before 1.18.
New World Center
PS3 worlds are tiny. Only 864x864 blocks large.
Bedrock worlds are infinite.
Using the New World Center option, you can choose which part of the Bedrock world should become the center of the limited 864x864 world size of PS3 edition.
The coordinates entered here are chunk coordinates. You'll want to use the NBT Editor's Chunk Locator to view your Bedrock world and find out the chunk coordinates you want to set as the center of the output world.
For most cases though, switching it to Spawn Point will work okay. This centers the world around the Bedrock world spawn point.
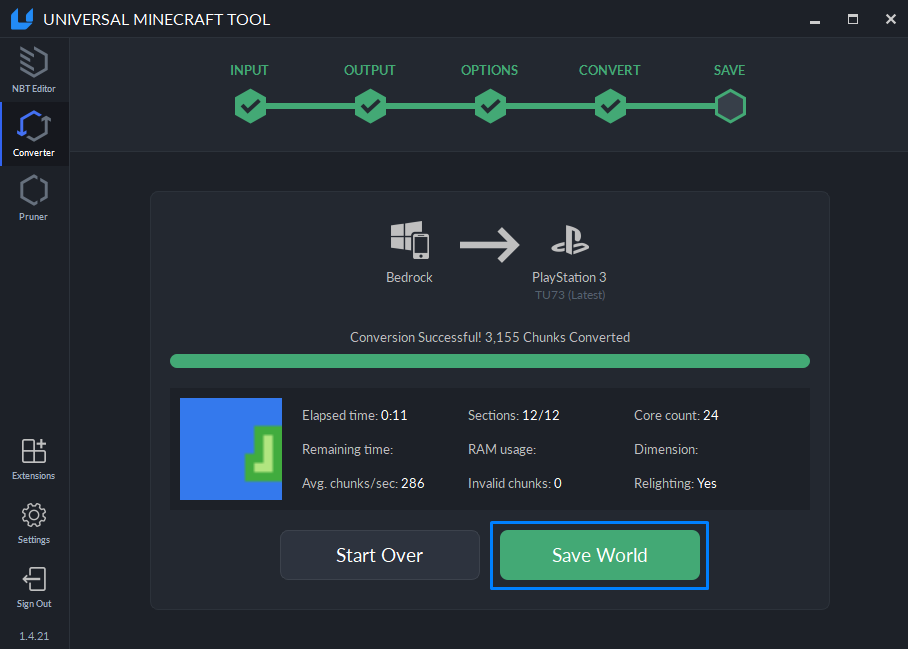
Step 4: Convert
It's the big moment!
Click Start Conversion to begin.
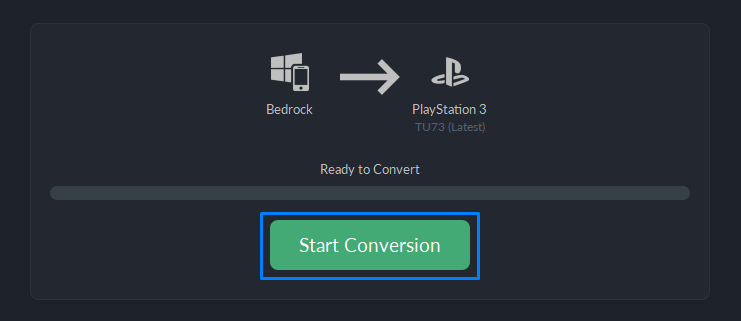
The UMT will now scan the input world and perform all the necessary conversion steps to create a super-accurate clone of your world for PS3 edition.
Plus it will shift the world into the right place according to your conversion options.
Step 5: Import Metadata from Reference World
You only need to do this step once, the UMT won't ask you to do this step again for future conversions to PS3.
You need to import the metadata of a normal existing world you made on your PS3 console.
Insert a USB drive into your PS3 console.
At the PS3 Home, go to Game > Saved Data Utility (PS3).
Press Triangle on any world and select Copy. Choose your USB drive from the listed storage devices to copy the world to your USB drive.
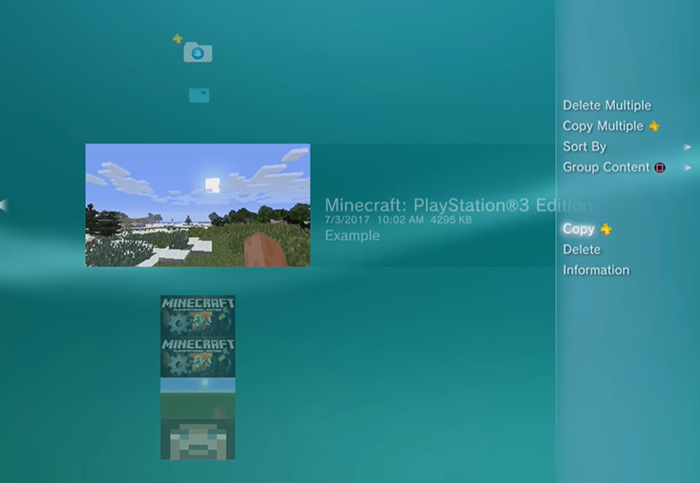
Unplug the USB drive from your console and plug it into your computer.
Click Save World to bring up the PS3 save window.
You'll see a window like this.
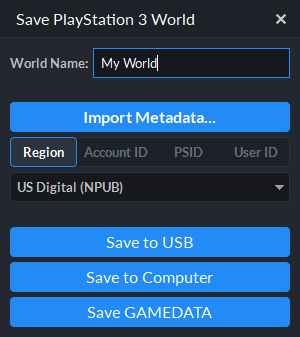
Click Import Metadata to bring up the list of PS3 worlds found on the USB drive.
Select the reference world you copied from earlier.
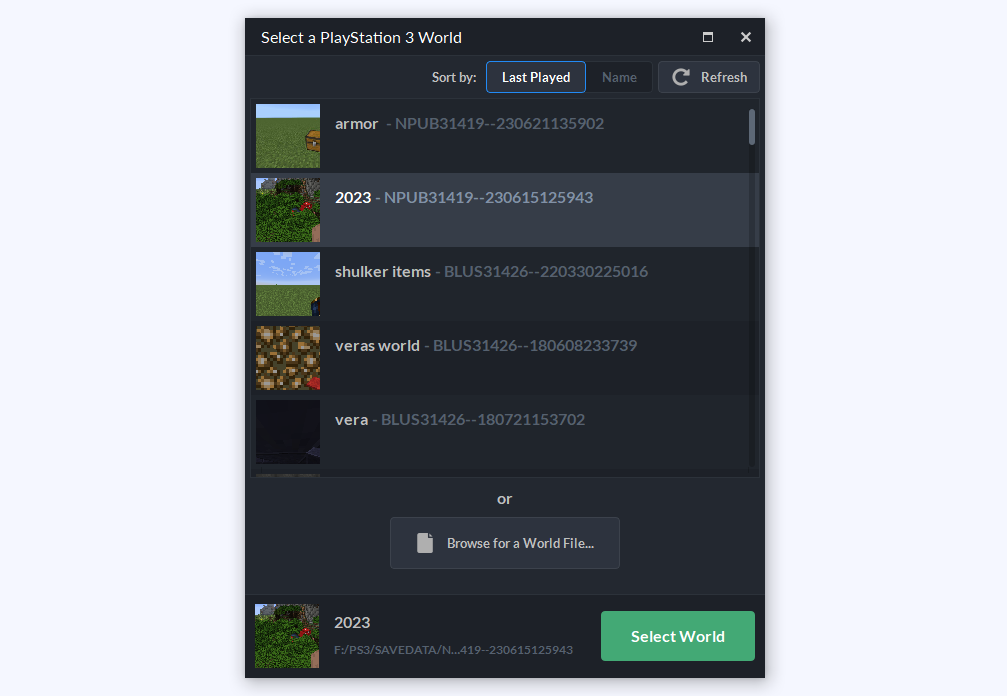
Once selected, all the metadata about your PS3 profile will be saved in the UMT, so next time you won't have to import ever again.
Step 6: Save the PS3 World
Within the same PS3 save window, you can enter a name for your world and then pick from three different saving options.
- Save to USB: saves the world directly onto the USB drive. (Recommended)
- Save to Computer: saves the world as a folder on your computer in the same format as if it were on a USB.
- Save GAMEDATA: saves the world without any profile or thumbnail data at all. (Saving a world like this will make it unplayable on a PS3 console. But it does hold all the actual Minecraft world data itself.)
After saving, unplug the USB drive from your computer.
Step 7: Transfer and Play
Plug the USB drive back into your PS3 console.
At the PS3 Home, go to Game > Saved Data Utility (USB Device).
Press Triangle on the world and select Copy to copy it onto your PS3 console.

Congratulations! You've successfully converted the world to your PS3 console.